Sunday, December 8, 2013

December ... already!?

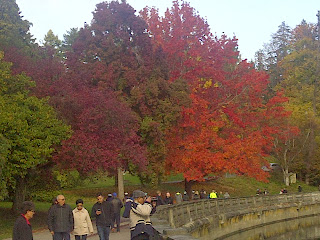
Can't believe it's already December ... time seem to just fly by!!  Let's see ... what have I been up to since the last post?  Well, I went to Vancouver/Kitimat at the end of October.  I was in Kitimat for work for a week but decided to go the Vancouver a day earlier to visit.  It's actually the first time I've done that ... usually, I just go for the time required.  Vancouver is great ... I'd definitely go back ... and the weather was amazing when we were there.  Oh and another cool thing ... my room got upgraded to one with a habour view.  Here a couple of pics of the view from my room :)


Here's a few pics of Vancouver ... it reminded me of Montreal, except it had Mont-Royal and the Old Port in one location.  Our hotel was pretty close to the habour and within walking distance of Stanley Park.  At the start of our walk, I saw this blue thing ... no clue what it is.


Here's a close up of that blue thing ... still don't know what that is.


Along our walk, there was a house suspended ... hope no one lives there ... quite the step down!


As you can see, the view was amazing and so was the weather ... all this taken with my phone :)


It rained the next day but stopped by about 7:30 a.m.  It was another nice day!


Yup, more pictures of planes :)


Sunday, October 13, 2013

Birthday invitations and tags ...

As I mentioned in my previous post, my neighbour's daughter turned 5 in August; and I also helped her with the birthday invitations and tags for the goodie bags.  It was fun working on this ... my neighbour and her daughter came over to help put the invitations together ... I thought it would add a personal touch if her daughter had a hand in putting together her invitations.  We had a couple of craft sessions ... with a purpose :)

Here's a picture of the invitation ... we did 2 different colours.  However, I forgot to take a picture of the pink one ... oops ... anyway, you get the idea :)  You may recognize the stamp used is one of my many Ketto stamps.  I just love those stamps!!


Here's a a few pictures of the tags for the goodie bags ... personalized :)  We decided to keep the tags for the girls in the same colour scheme as the invitations and used green and blue for the boys.


Here's a close up of the tags ... I used the same embossing folder as the invitations, so that they would match ...


On the other side of the tag, I used 2 other images from the Ketto stamps that my neighbour's daughter chose.  We then decided to use the Ketto stamp "Froggy" for the boys ... seemed more appropriate than a fairy or princess :)


Love this little guy ... so cute!!

Saturday, September 21, 2013

Craft activity ...

Here's a craft activity that I came up with for my neighbour's daughter's 5th birthday.  Initially, I thought of having the kids make a bookmark ... however, hubbie ask "Do 5-year-olds read?"  Hmmmm ... good point ... so I thought a door hanger would be a better option.

I made a few samples to figure out the measurements etc.  I figure it would be least messy if we used alcohol inks.  Also, I thought I'd use my Fiskars Stamp Press ... easier for the kids to stamp an image.  Also, I precut the letters of the kids' names, so the door hanger would be personalized.  Here's a picture of some of the samples I made ...


I even scored the top and bottom of the image to add a little detail and make it easier for the kids to know where to stick the image.


Here's another picture with it in action ... of course, I needed to test it out to make sure it fits properly on a door knob :)

Sunday, September 15, 2013

Hello!

Oops, I didn't mean to go so long without posting anything!  I'll try not to do that again.  So, I hope all is well with everyone.  I was on vacation a few weeks ago and meant to post something but got busy and yeah ... was kind of lazy.  The plan was to post something last weekend ... however, something came up.  To be honest, I didn't think I would be posting anything this weekend as I'm currently recovering from a cold ... I'm better but still coughing and blowing my nose :(

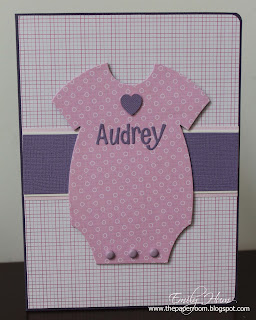
Anyway, I've done a few things a while back that I didn't share, so I'll start with those. Here's something I did for my cousin who had a baby girl in June.  I made a card (of course) and a matching box for the gift, which by the way we did not purchase before making the box.  We kind of knew what we were going to get and hoped it would fit ... it did :)


Here's a close up of the box (inside and outside) ... the stamps used are from the Inkadinkado stamp set "Welcome Baby" ... so cute.


Here a couple of picture of the card (inside and outside) ... the onesie die cut is from Papertrey Ink ... love that die! 


Lastly, I made the red envelope for my mom since I figured she would be giving lucky money :)

Sunday, May 19, 2013

Mother's day card ...

During my vacation ... over a month ago ... wow, time sure goes by fast!  Anyway, I decided to get a head start on my card making since it's going to be quite hectic when I get back.  I had a lot of fun putting together this mother's day card!  Also, the cool thing about this is that I knocked off 2 things from my list (make a mother's day card and use the Papertrey Ink Spinner Die Collection) ... yeah, I'm wierd ... I made a list of craft things I wanted to do this vacation ... I always do.  However, this time, I wasn't going to stress out if I didn't do everything ... it was more of a list of what to do if I was looking for something to do ;)


Here's a close up of the card ...

 
It's a spinner card ... the Happy Mother's Day sentiment actually spins when you tilt the card from side to side.  I had fun watching the circle spin back and forth when I die cut the pieces out ... "Hours of fun!" I told hubbie ... he just looked at me like I was nuts :P ... Wha!?  I needed to test it to make sure it works :)


Initially, I was going to put a butterfly and have that spin ... however, it just didn't look right with the images I stamped.  I tried several versions of the butterfly ... just didn't seem right.  I thought of a flower but couldn't find the right one ... then it came to me ... yup, the sentiment spinning and I added the flowers, which I have a lot of too!


I stamped the same images on the inside of the card, so it matched the outside.  I decided not to add any flowers ... wanted something simple for the inside.  So, what do you think of my first spinner card?


Anyway, here's a video from Nichole Heady of Papertrey Ink showing you how to create a spinner card with the die I used ... http://www.youtube.com/watch?v=mQVFpUgwKIc

Friday, April 26, 2013

Another card set ...

Using the Birthday Circles stamp set from Wild Rose Studio (www.wildrosestudio.co.uk), I made another card set.  I love this stamp set ... I actually got a few of their circle stamp sets.  They're great as a seal, embellishment on a card, on a tag, or as the main focus of the card.


Here are the cards I made ... as you can see the images of the Birthday Circles stamp set were the main focus of the card.


I embossed the front of the card with the Craft Concepts' Cherry Blossoms embossing folder, which I bought when we were in Nova Scotia.  Here is a close up of the cards ...


Next, I layered strips of paper across the center of the card ... I actually put a strip of white paper between the 2 coloured strips ... yeah, I'm still trying to use up those scraps of paper!  I layered the sentiment on coloured cardstock and then on the smallest Lacey Circle ... I use this Spellbinder die quite a lot ... it's one of my favourite dies!  I didn't emboss the sentiments, but I think it still looks nice :)


I love the look of the card ... it's simple ... in case you didn't notice, I like simple things with just the right touches :)

Sunday, April 21, 2013

Card sets ...

Awhile ago (probably 2-3 months ago), I decided to make some cards with some of the Flourishes stamps sets that I got while we were in Nova Scotia last year.  I die cut 15 of die A from the Papertrey Ink "Sending You" die collection.
Sending-You-dies 

I used 2 images from the "A year in Flower I" and 1 image from "Botanical Bookplates vol 2" and stamped each image 5 times.  Using colouring pencils and solvent, I coloured the images different colours.  I just had the leaves on one to finish colouring and then I would be able to finish the cards.


Well, I finally finished colouring and made the cards while I was on vacation a few weeks ago!!  I love using this technique ... it's very forgiving.  If you colour over the lines or something too dark (which was my case for 1 of them), you can use an eraser and re-colour ... even months after you coloured it :)


You'll notice that I have strips of paper going across the center of the card.  It seems to anchor the image and allows me to use some of the scraps of paper I have ... and believe me I have a lot!  Here's some pictures of each stamp set and a close up of a card from each set ...


I think the tulips set is my favourite ... for some reason, I love tulips :)


Intially, I planned to stamp the same sentiment for each set. However, when I got to the last set, I decided to stamp different sentiments.  I don't know which is better ... anyway!  Another option would be to have different flowers in the same set with a different sentiment ... the possibilities are endless!


Saturday, April 20, 2013

Hexagons ...

Sorry for going MIA again ... I meant to post some cards I made while I was on vacation, but I'm not sure where the time went.  Anyway, here are a couple of cards I made with the Hexagon die from Papertrey Ink.  It's a great die ... covers the whole front of a 4.25" x 5.5" card.  I think the longest part was matching the pattern paper back to the correct spot after I decided to leave some hexagons in. 


With the second one, I tried to carefully pop out the outline only when removing the it from the die.  Unfortunately, some of the hexagons popped out as well ... more matching ... it's a good thing I like puzzles :)  Here's a close up of each card ...


I die cut this die on white card stock and stuck 2 layers on some of the hexagons, so it would look elevated ... giving the card some dimension.  I really like the way that looks!

Tuesday, March 26, 2013

Hello there ...

Hi everyone!  Sorry for not having posted in a while ... time sure goes by quickly!  I can't believe we're already heading toward the end of March.  I guess that's what happens when you're busy ... you don't see the time go by.  I don't really have any craft share today ... just thought I'd pop in to say "Hi".  However, I do have this to share with you ...


Some of you can probably guess who's handy work this is :)  I'm pleased to introduce to you another one of hubbie's creations.  Yup, it's a rubber band ball that he started many years ago (he can't even remember when).  Anyway, I haven't seen it in a long while, so he sent me a picture of it.  It has definitely grown!  BTW, those are the safety glasses he wears when he goes into the plant, so you can imagine how big it is.  It definitely gave me a good laugh when I saw it!