Sunday, August 3, 2014

Papertrey Ink Onesie ...

It's been a while since I bought the onesie die from Papertrey Ink, and I've made several cards with it but only as an embellishment.  Recently, a friend asked me to make a baby card for someone at work who is having a baby girl ... and since there is only 2 people that would be signing the card, I knew what I was going to do.  I've been wanting to make a card in the shape of the onesie ... well, I finally did it :)

Here's the card ... what do you think?  It took me a while as I ended up die cutting the onesie a few times, so that the card would be sturdier.  I love that it stands on it's own ... yeah, it doesn't take much to make me happy :)


Here's a side and back view of the card ...


I had so much fun making the card ... I decided to make a tag for the bag as well.  The tag in this case was just something quick and simple!  I love this tag die from Paper Smooches ... it's the stitched border that made me buy the die ... it gives the tag that extra something :)  The cute little bear is from Papertrey Ink stamp set "Baby Button Bits".

Sunday, July 20, 2014

Ahhhh!!! I can't stop ...

When I say I can't stop, I'm not kidding!!  I spent a couple of weekends making notebooks :)  Here are some others that I made ... all together I've made 30!!  The best part is that I was able to use a bunch of scraps that I had left from cards I made ... how cool is that!?


Here's a close up and more neatly stacked :)

So far, I've kept it easy and simple and embossed the cover ... however, I'd like to decorate it another way, so I see more notebook making in the future ;)

Sunday, July 13, 2014

Anniversary card ...

It been at least a couple of years since I've wanted to buy some of the Simon Says Stamp products. Well, I finally took the plung last month!  Yup, I finally placed an order ... actually, I've placed 2, but the 2nd one was on Ranger products ... they were having a sale :)

So, I use the Small Love You and Floating Hearts craft dies from Simon Says Stamps on the anniversary card that I made for hubbie.  The Small Love You die is Kristina Werner's handwriting ... just love her handwriting and her ... she's so talented!!  She also designed the Floating Hearts die.


Well, here's the card ... FYI, the You Mean the World to Me die is from My Favorite Things.


I wanted to do something in the inside of the card, so I thought it would be nice to use the Floating Hearts die somehow.  It suddenly came to me to cut enough out, so it became a frame; and I would be able to write a message in the middle :)


I even used a few of the remaining pieces to decorate the envelope, which I made with the We R Memory Keepers Envelope Punch Board.  I just love that envelope punch board ... it makes it so easy to make a matching envelope for cards :)


Sunday, July 6, 2014

Notebooks ...

After seeing a "Make It Monday" video on Nichole Heady's website (http://nicholeheady.typepad.com/) showing how to make notebooks, I decided to give it a try :)  Here's my first notebook ... I decided to make it simple and just emboss the cover.


I selected 3 shades of pink and cut the paper to 2 3/4"x4 1/4" and stamp "just a little note." on each page using a different frame for each shade of pink.


My first "customer" was my mom :)  Sight unseen, she asked for one as she wanted to keep one in her purse, so she had something to take down a number or make a note.  I gave her this one ...  


Here's a picture of the back and the pages ... I left the pages blank for this one.


However, after talking to her, I learned she preferred a smaller one, so I decided to make one half the size (2 1/8"x2 3/4") of the 1st one I made for her.  She found the smaller one really cute ... me too!


I must admit this brings back old memories ... I remember making little notebooks when I was younger except they were not as nice ... just a bunch of cut paper held together by staples.  At one point, I said to my mom "I really like paper." ... her response "I know ... ever since you were little."  I guess some things just don't change :)

Sunday, June 29, 2014

Gelatos birthday card ...

Here's a birthday card I made for a friend's birthday earlier this month.  She's the one that I made the card set for.  She's one of the few people I know who goes out looking for the perfect card for someone.  I always get unique handmade cards from her, so I wanted to make something really nice since I was on vacation and had the time.

I decided to make a card using Gelatos.  I've made several of these cards ... ok, maybe that's a bit of an understatement ... I've made over 20 cards!  I had given a class last October and went a little crazy with samples.  I love the way Gelatos look on dark cardstock!!


As you can see, I added some stickles to give it a bit of a shine :)  Sorry about the fuzzy close-up picture ... well, it adds to the effect of Gelatos on dark cardstock :)


I wanted to make the card more special ... so, I decided to stamp the inside of the card too.  The stamp that I used for the front of the card is part of a 2-stamp set, so it was perfect!


After making this card, I got a taste and am planning to make some more!  I have a reason ... well sort of ... someone at work wants to buy some.  However, I don't think she will be buying the quantity that I'm planning to make though :)

Monday, June 16, 2014

Card set gift ...

Here's a card set I gave as a birthday gift to a friend.  It's similar to some other cards that I previously made ... but I can't seem to stop making this style card!  As I've mentioned, I love the way embossed white cardstock looks.  I was also trying to use up some colour cardstock that I had.

Basically, I made 2 cards each with the same flower and colour scheme and stamped different sentiments.  This simplified things, but it still took a bit of time to finish them.  Pictures are a bit dark, but you get the idea.


I decided to make some matching envelopes for the cards using the Envelope Punch Board from We R Memory Keepers ... love this tool!  Oh and of course ... I die cut some circles with adhesive backing to close the envelopes ... you know like a seal :)


I also made a box to put the card set in since I did not have a box that would fit 10 cards and envelopes.  I used 110 lb white watercolour paper to make the box and covered it with burgundy cardstock and then pattern paper ... covering the lid and base of the box decorated it as well as made the box even more sturdy :)


In went the cards and envelopes ... perfect fit :)


Final step ... tie it with matching ribbon and there you go!!

Saturday, June 7, 2014

We have a tenant ...

Hubbie and I were pulling weeds a few weeks ago during our vacation ... yup, a fun vacation activity :)  Anyway, we stop to chat with one of our neighbours, and I noticed something ... we have a tenant!


A bird built a nest in our tree ... hubbie and I think it's quite cool!  Here's a picture where you could see the nest.


However, the bird wasn't facing the right way for the camera, so I went around to the other side.  Somewhat better ... it took a few attempts as it was a bit windy and the leaves kept getting into the picture.


Oops, I got a bit too close and the clicking of the camera scared it ... sorry!  Came out of the nest ...


... and then on to the neighbour's fence.  Figure I better leave it alone.


Oh, here's some other outside news ... hubbie and I finally got some plants and planted them in the flower bed in front of the house.  We figure it was time to grow something else instead of weeds.  Hubbie said since he mastered growing weeds, he figured it was time to move on to something else :)

Hubbie did the actual planting ... I helped him fill the flower bed with soil and took off after seeing a bunch of mosquitoes flying around.  I already got bitten once when we were pulling weeds, so I didn't want to get bitten again!  However, by the end of our vacation, I got bitten 3 more times :(


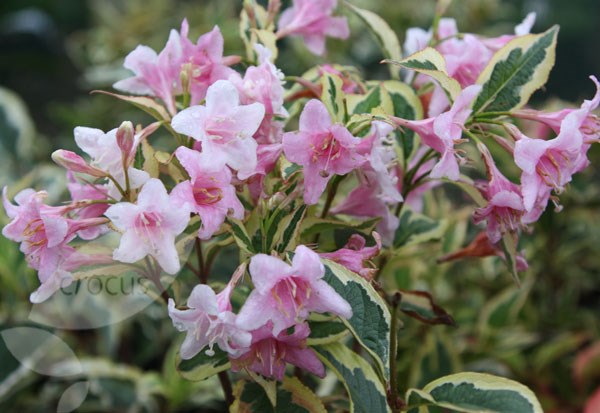
We planted Weigela Florida Nana Variegata ... quite the mouthful.   They're suppose to look like this ...


Initially, we thought maybe we would plant some annuals flowers until they grow to their full size, which would be in about 3-4 years.  However, we didn't know what to plant ... maybe next year ... one step at a time :) 

Saturday, May 31, 2014

Red envelopes ...

Finally, got around to tweaking the pictures of the red envelopes that I made for my cousin's wedding in April.  I didn't know if he was planning on having a tea ceremony and if we would be involved ... so I made a few extra in case ... I made 15 of them and used 2 in the end.  Here are a few pictures ... the larger one was for my mom as I figured she would be giving cash.  The smaller ones fit a few bills or a cheque ... I measured :)


This was the first small one I did as I wanted to use this die from Papertrey Ink.  I like it but thought the double happiness may be a bit on the large side, so I thought of another design ... which is the ones in the above picture.


Here's a close up of some of them ...


These ones were made with gold coloured paper, and I added a layer of red on top of it ... both in front and the back.  I have so much gold colour paper left from my brother's wedding invitations I figure I should use some of it :)


I actually had a lot of fun making them!  I think I should make a bunch more ... never know when you will need some :)